Next: 2b: Windbg part II
2a: WinDbg
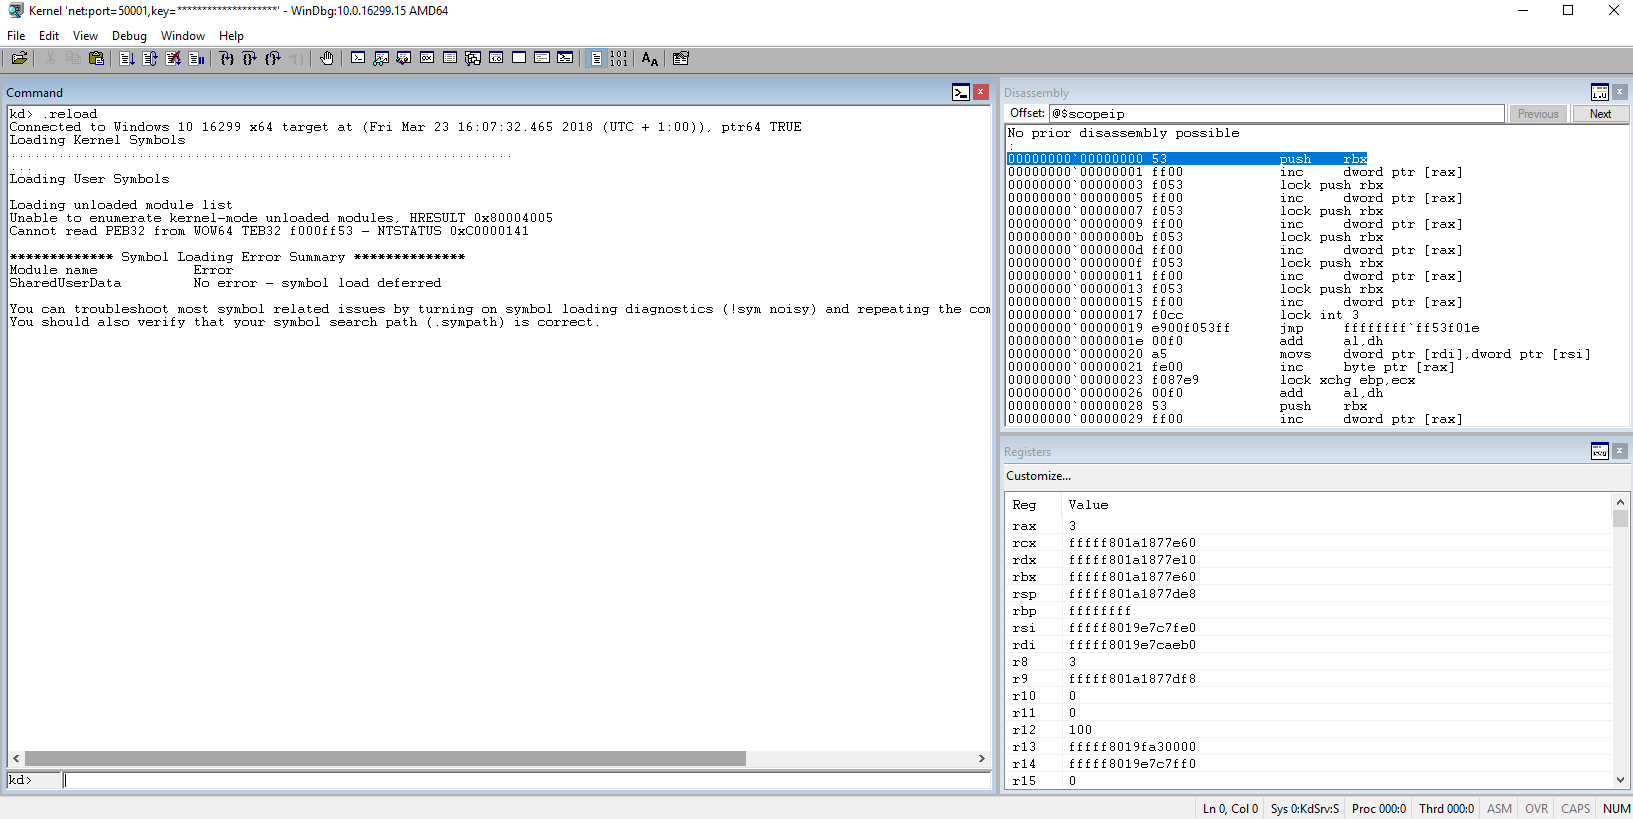
Windbg is basically a commandline where you enter specific debugging commands (based on the command line debugger kd.exe). To justify using a desktop application you can open additional views to make things easier. I would suggest you open at least a disassembly view. And save you workspace or Windbg will just reset next time it starts up.
Windbg has a lot of commands and most of them are rather unintuitive. Windbg.info (http://windbg.info/doc/1-common-cmds.html) has a thematically grouped list, but it feels like reading a phone book. I tried to create a list of important commands (tutorials:winkdbg:page2x) but I am not very fond of it. So I will try to walk through some basic tasks and hope this will give you a feel for the syntax and common commands. Afterwards you can use google, the official Documentation and of course part 3 to become and expert.
In general commands fall into three categories. Anything starting with a . is a meta command, commands starting with a ! (//”bang!”//) are extension commands and all the others are built-in debugger commands. But don’t rely too much on the distinction, for some commands it feels completely arbitrary. The extension commands come in all forms and flavors, most interesting for us are the ones in // kdexts.dll// that use proprietary magic to display kernel information that is difficult to get any other way.
Let’s get started
I am using Windbg for debugging and a Windows 10 1709 VM idling after user logon. First a few commands to check that everything is in order: lm, list modules will show all loaded modules. This should show a long list of loaded modules. Next are .sympath which should show your correctly configured symbol path and .reload to load the symbols for all the currently loaded modules. Then try lm again. If it still doesn’t show a list of modules something is really wrong and you should restart ((If a restart doesn’t trigger the kernel debugger you may have to shut down the debugee and start it again. Definitely needed with Virtualbox 5.2 and 1709 ))
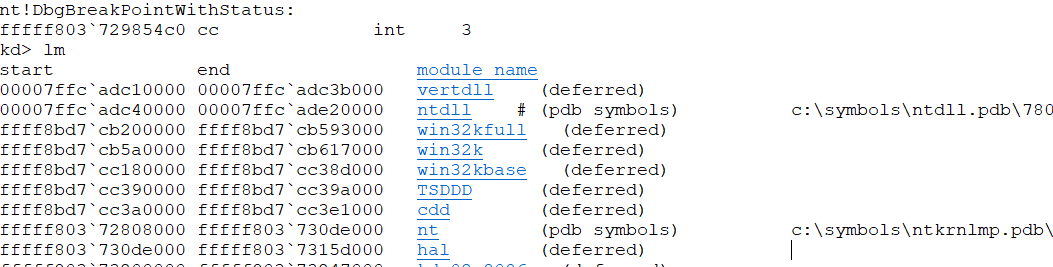
If it works we are set and ready to take a closer look at the output. The lm command is the best we have for an easy memory map and can be quiet useful. If you look at the memory addresses where the modules are mapped you should see both userspace modules - at least ntdll ((Windbg sometimes plays stupid and doesn’t detect ntdll, a restart should fix that. And if you start to see a pattern in my problem solving solutions go blame Bill.)) - and kernelspace modules - nt, hal and all the rest.
Breakpoints
Everyone reading this should know what a breakpoint is and what it does in application debugging. So let’s set a kernel breakpoint! The question is.. where? For that we need the x((The x command is highly useful but it can also be rather stupid. For example it can’t find symbols starting with and underscore.)) (examine symbol)) command: x nt!NtCreate* will search the symbol file of the nt module ((Mr. Kernel himself!)) for anything starting with NtCreate. We will pick one that is easy to trigger and set a breakpoint on it: bp nt!NtCreateUserProcess. Continue execution with g(go). If you switch to your debugee VM and launch any executable the debugger should break right at the start of nt!NtCreateUserProcess.
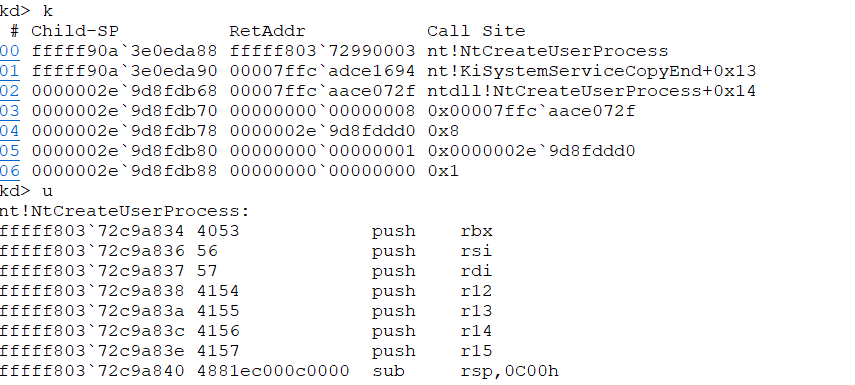
We verify this using k to view the stack (or kc for a clean call stack view) and u to unassemble the current address.
For anyone not familiar with assembly code or how functions work I will try a
Introduction into assembly, function calls and the stack
This is really just a quick rundown, use google frequently if you don’t know what I am talking about.
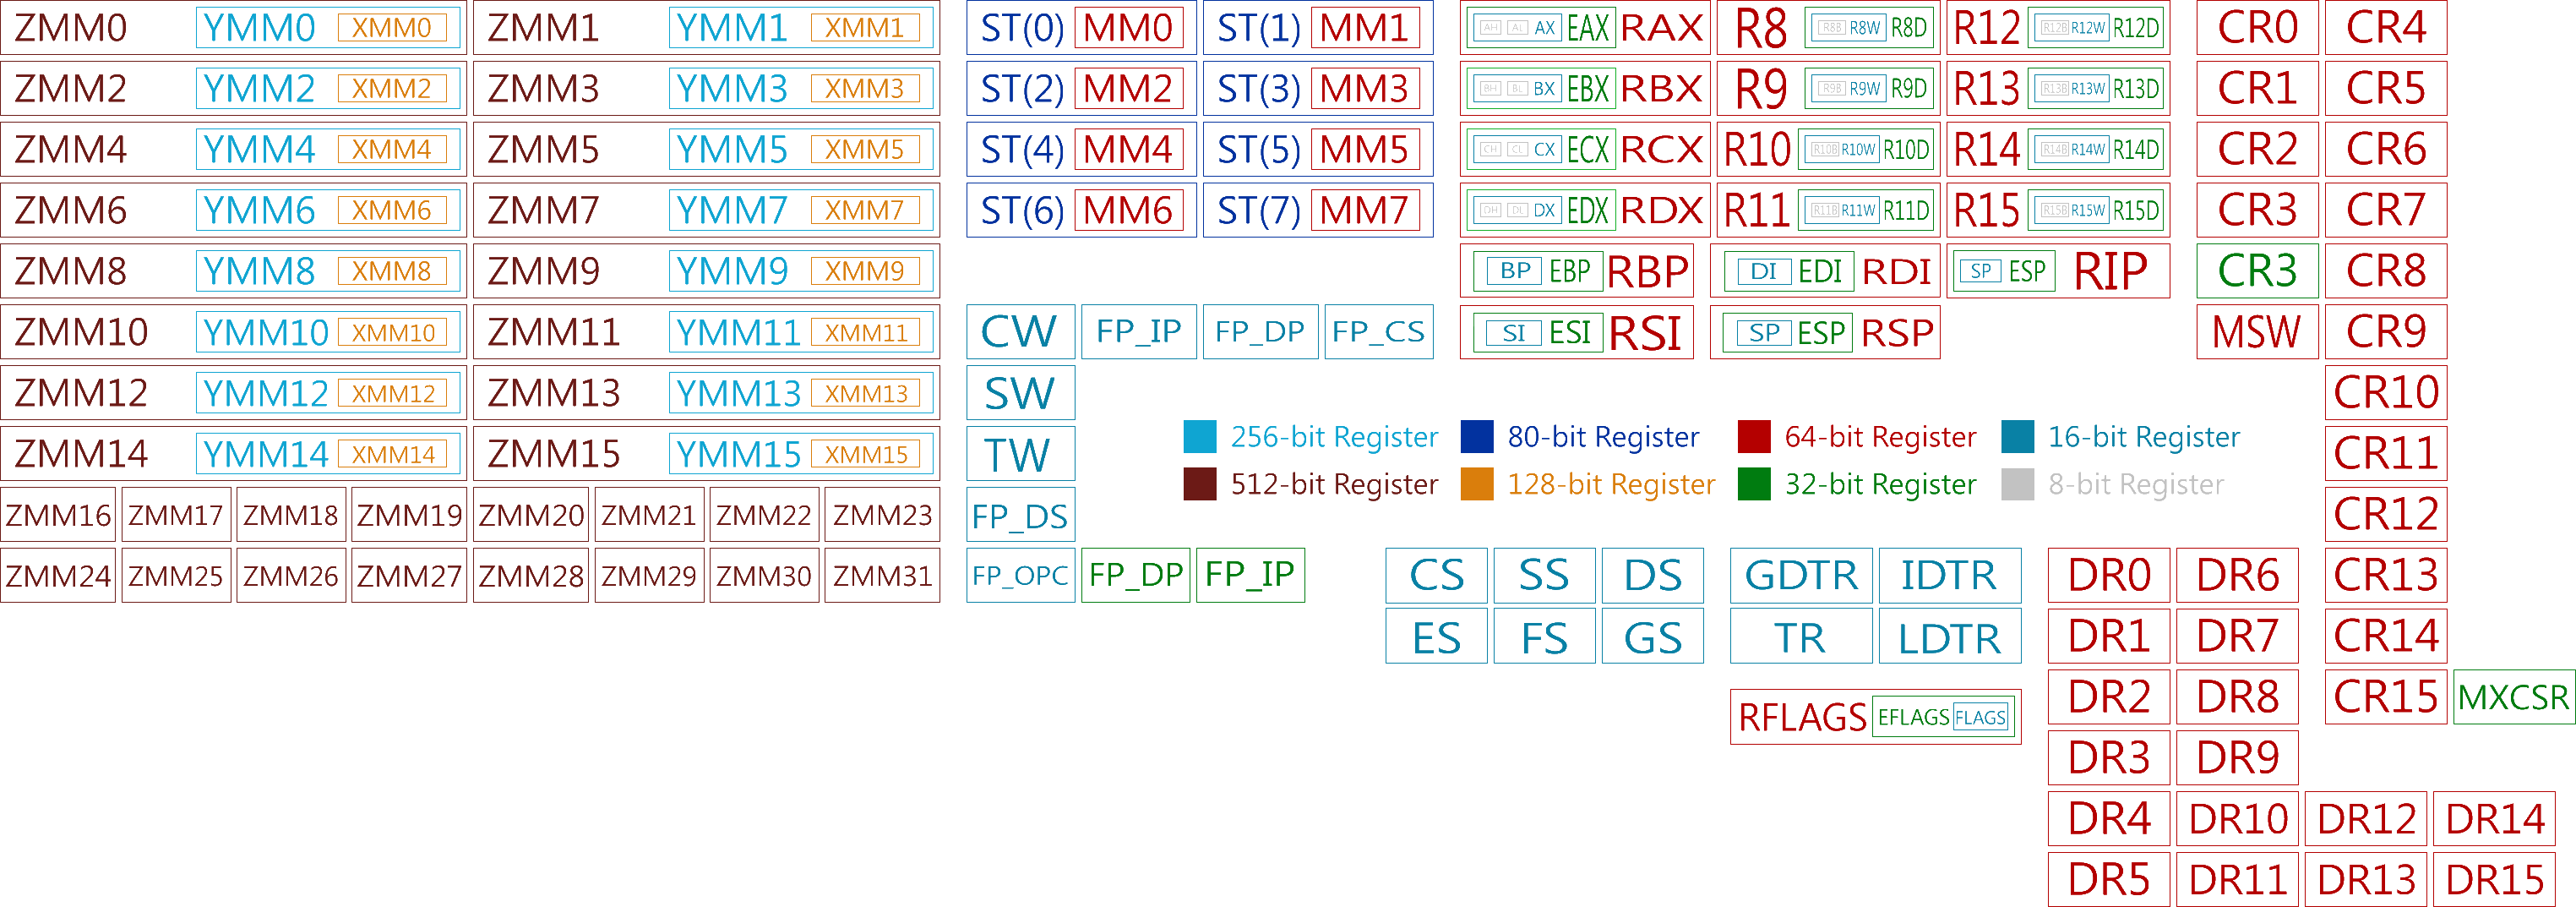
The CPU of any computer works with assembly instructions specific to it’s architecture. For us that is most likely x64 Assembly. Any program, app and the kernel code is translated into assembly instructions and they are worked off one by one by the processor. This get’s rather complicated with multiple processors, cores and modern processor architectures but we can ignore that for now and just assume we have one processor like back in the good old days. Most of these instructions involve registers a set of temporary storage units that are very close to where the CPU does the actual calculations. There are a lot of those, some are for general use and some have very specific functions. For example RIP contains the instruction pointer. It points to the place in memory where the next instruction is waiting to be executed. And unless the instruction tell him to do go somewhere else he will expect the next instruction right after that.
A quick example. The instruction x = 5*2 in any random programming language becomes something like:
	mov rax, 5 # move 5 into register rax
	mul rax, 2 # multiply register value of rax by 2
	mov qword ptr [rsp+0B0h], rax # mov content of rax to rsp(stack pointer)+0xB0
Note that the processor doesn’t care if we call our variable x,//y// or F**ckYouProcessor, it’s just some memory address on the stack. That is what the symbol files are for. Without symbol files we can still read the assembly code but variables and functions don’t have names. And what is this stack you may ask: it is a last in first out data structure a process (or thread) uses as general data dump. Much like a small desk.
Back to our NtCreateUserProcess. This function was called with the call fffff80372c9a834 (see screenshot) assembly instruction. This tells the cpu to continue his execution at address fffff80372c9a834, but also to handle this as a function. That means he prepares himself to continue execution right after the call instruction. The way this is done is, you may have guessed it already, via the stack. The content of the Instruction Pointer register is pushed on the stack (the “return address”) and the processor jumps to the specified instruction. Note that there are also normal jump instructions that don’t involve the stack - they are used for the usual branching (if, for and all that) inside functions.
If we look at the stack now we see the return address right on top. And if we would dig around it a bit we would find out that it is inside the function nt!KiSystemServiceCopyEnd. But Windbg already did that for us.
But it will be an interesting exercise poking around that. So copy the return address from the stack (for me it is nt!KiSystemServiceCopyEnd+0x13), do a .cls to clear the screen and run uf nt!KiSystemServiceCopyEnd to disassemble KiSystemServiceCopyEnd. Note that the return address is likely a label and not an address. So it isn’t nt!KiSystemServiceCopyEnd + 0x13, but some place inside the function called nt!KiSystemServiceCopyEnd+0x13. That gives even me a headache but better get used to it. Your can use ctl+f to search inside the command window, or just the gui stack and disassembly windows to point and click your way to it but eventually you should find something like this:

If you go back to u nt!NtCreateUserProcess you will note a number of push instructions that push the content of several registers on the stack. These are registers that Microsoft deems worth saving when a function is called and part of the Windows function calling conventions. If you poke around a bit in nt!NtCreateUserProcess you will also find how they are restored via pop instruction right before ret tells the processor to return to the calling function.
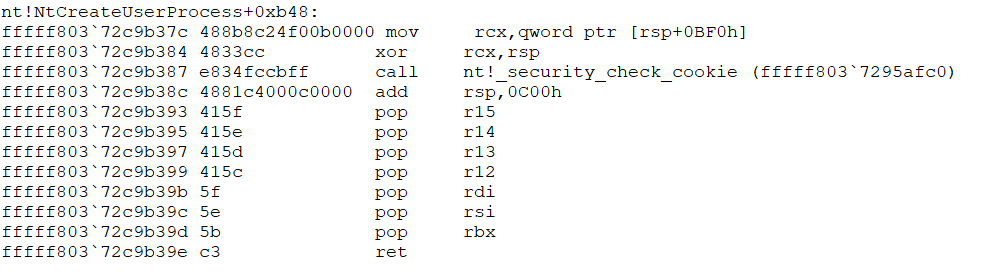
And a bit beyond of what we are doing right now you can also see the Windows Stack protection (//security_cookie//) at work that tries to prevent people from overwriting the stack and thereby taking control of the instruction pointer and thereby the computer.
I hope this helped refreshing some basics, if you are still clueless check the interweb for a more generic instruction to Assembly and how instructions work.
Additional u command will continue showing disassembly, uf nt!NtCreateUserProcess will disassemble the whole function and u <address> L20 will display 20 lines of code starting at <address>.
According to the official MS documentation the function stack isn’t fully set up until the function prolog has executed. That are the initial push instructions saving several register states, the stack pointer correction and the stack canary (security cookie). We will take a closer look at what happens. For that k isn’t a big help, we need to use dp rsp to look at the actual stack in memory. The basic command is d for display, p for pointer size and rsp, the stack pointer register, points to the current stack location.
Afterwards search the function for the matching epilog, set a breakpoint so you can also examine the epilog. If you are bored from watching the stack at least set the breakpoint and have your debugee break into to it.
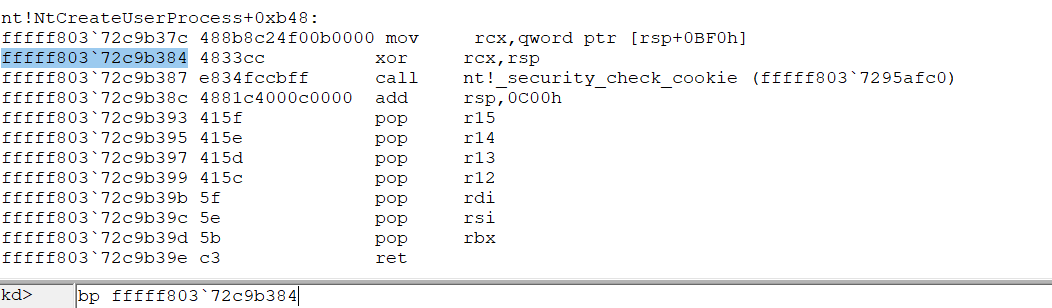
Unfortunately we are not done with breakpoints just yet. What we did was create a “normal” breakpoint. Sometimes it is useful to use bu to create an unresolved breakpoint that is only really created once the matching module gets loaded. And there is bm which will set a matching breakpoint on anything it can find. A quick example is bm NtCreateUserProcess, which will create a Breakpoint at both the usermode (ntdll!..) and the kernel mode (nt!..) function. And lastly there is also ba which will break on memory acess. It is special because it uses a different mechanism and can break at things normal breakpoints can’t. Maybe we will use it later in the tutorial.
Afterwards use bl to list your breakpoints and bc * to delete all of them.
This was really a lot and the page is getting rather long. Let’s continue in the next episode: WindDbg2.